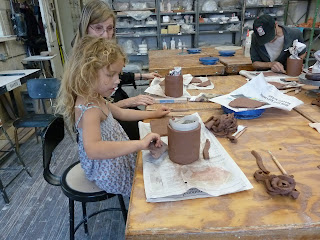
Gushy, mushy sloppy mud. That's what clay is. But it's special mud, mud that can be baked as hard as stone, mud that can become dishes, or flower pots. Come with us to Greenwich House Pottery and take a parent-child pottery class.
Greenwich House Pottery is located in a beautiful building in Greenwich Village. It is a professional pottery center for sculptors and potters. Happily, it also offers parent-child classes.
Mary described some techniques for working in clay. She gave us some tools we could use to press decorative marks into the clay.
Mary showed us "the slab roller table" with its large wheel. She explained that you place your lumpy clay on the table and then run it through the "slab roller" (no fingers please) to get a perfectly flat slab of clay.
We each ran our clay through the "slab roller." Then, we trimmed the uneven edges. We cut a large piece off the slab for the bottom of the pot. We rolled our slab around a "can"shape to form the wall of our flower pot and joined the two ends. We placed the "flower pot" on our "bottom" piece, and followed the shape of the pot to cut a circle for the "bottom." We cut little lines, crosshatches, along the edges of the "bottom," and wet them a little bit, so we could join them securely.
We smoothed the sides of our pot with a "smoother," a little piece of flat plastic.
We added flower shapes to one pot. We rolled little balls and pressed them flat to make flowers.We rolled coil shapes for flower stems. The second pot became an elephant. We flattened two balls to form the ears, rolled thick coil shapes for the legs and made pointed tusks.
We cut small holes in the top of the "flower" pot as decorations. We cut a hole to drain the extra water from the bottom of the pots.
We painted the pots with "slip glaze," thin clay color. We painted one pink and one blue. Clear, shiny glaze would be painted over the slip.
The pots would dry for a week and then be 'fired," baked in a kiln, a very hot oven (2000 degrees), that would turn the pots from soft mud into something as hard as "stone." We'll show you our finished pots in a future blog.
We loved our clay workshop and are planning to sign-up for classes at Greenwich House Pottery this September. Hope you will join us.
Meanwhile, here is a great clay project you can try.
Project: A Self-portrait (at Greenwich House)
• Take some paper plates. Look in a mirror. Use a thick marker and draw your portrait.
• Place the plate on a slab of clay. Cut out a circle.
• Make some coils, (you know, you roll them under your hand). When they are even and pretty thin (but not too thin) use them to "draw" your portrait on the circle. Put a little "slip," (watery clay) under the coils to join them to the slab circle.
• Let your "portrait" dry.
• Paint your portrait with glazes. Greenwich House has the glazes.
• Greenwich House will "fire" the pots for you in their "kiln." A "kiln" melts glass...which is what glazes are made of.
• When your portrait has been "fired," Greenwich House will mail it to you.
Greenwich House Pottery
Jones Street nr West 4th Street
Jones Street nr West 4th Street


No comments:
Post a Comment